Meth stove
 28 Jun 2011
I saw pretty cool stove the other day and decided to have a go at it.
The final stove was a little messy but should work fine - I’m going to test it on Thursday and see if it works or not.
Some notes before starting that I found out the hard way:
- Be careful once you start making cuts - You end up with tiny bits of metal that are very sharp.
- File off the edges - It makes the metal easier to work with and stops you from slicing your fingers open.
- Measure the height of your inner wall - It makes fitting the thing together much easier.
- Don’t slice down the side of the can when scoring off the bottoms - This makes it easier to get the bottoms off but means you need a spare can for the inner.
- Be careful when making the holes in the top - I started out with a pin that made nice round holes then broke it so used a knife that made much bigger “slots”.
- When rolling your inner wall use a bit of tape - it will burn off later.
How to
First you are going to need:
- 2 x Empty drinks cans
- 1 x Very sharp knife
- 1 x File
- 1 x Saw (You could use your knife but a saw makes it easier)
- 1 pair of scissors (Once again you could use your knife but this makes it easier)
Step1
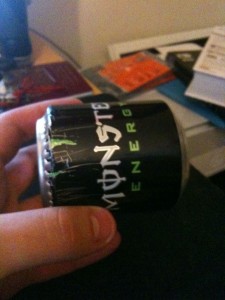
Firstly take 1 empty can and turn it upside down so the end without a hole is at the top for you to work on.
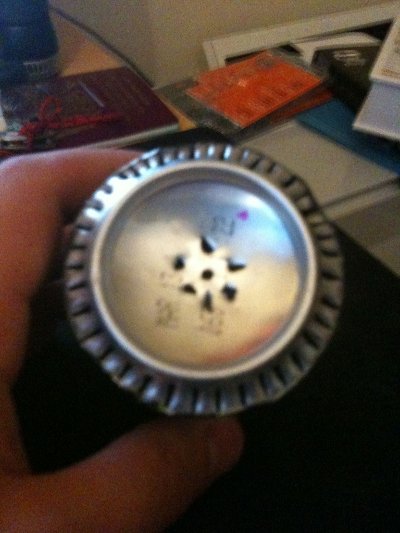
Carefully punch a bunch of holes around the outside for burners and a few holes right in the middle for filling.
Make sure not to put the middle holes too close to the outside - you need enough space for the middle wall to separate the fuel.
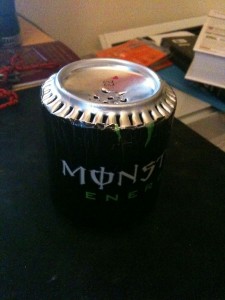
You should end up with something like this…
Step2
Next you need to cut off the bottom of the can (the actual bottom, where you just made holes in). This will be the “top” of your burner.
An easy way is to clip your knife onto the back of a book then score around the outside.
Once you have a good score line take your saw and run it around to make a cut.
Then after you have just the bottom of the can left take your file and smooth off the top. If need be use your scissors/knife to trim off any crap.
Step3
Now you need to make an inner wall which fits around the “dip” in your burners top.
Slice down the side of the can (use the bit you just cut off) and remove the top of the can.
You should be left with basically the body of the can (you may need to use another can depending how big you cut the top of your stove)
Now roll it up to fit around the dip in your burners top and mark it with your knife.
Take a pair of scissors and cut it down to size then tape both ends just to hold it in place.
I taped it a little smaller than it needed to be then pushed it around the dip - this made a tight fit so the next step was easier.
Step4
Cut out some notches in the top of your inner wall - this will be where the fuel can flow though into the bottom of the burner.
You should end up with a circle of notches sticking out the top of your burner top.
Step5
Now to make the burner bottom, take another empty can and measure it against your burner top.
You want to make it about 1½ times the size of the burner top.
This will fit over your burner top and make the base of the burner where the fuel flows into.
Step6
Now we need to fix the bottom to the top.
You want to end up with your inner wall matching up with your little dip in the bottom of the burner as you did with the top.
You can use a spare piece of the side to help you ease the cans together.
You should get a really tight fit - I had to cut down and file off the outer can after as I did the measuring wrong.
Now you should basically have a can with an inner can - You put the fuel in the middle and it flows down to the bottom of the can where you can light it.
Footnotes
I’ve seen a few other people’s stoves and they seem to cut them down to just under 2”.
Mine ended up slightly bigger as can be seen below. I’m not sure how this will affect its performance but it should produce a better cooking height.

Another thing that was done differently was the number of burners - this will probably use more fuel but should produce a larger heat.
Other
I’m going to light this on Thursday and see if it works fine - It might explode or work fine. I think I slightly crimped the inner wall while fitting it together.
If it works fine I’ll probably build another and document it better else I’ll do a design review. As long as my phone doesn’t die on me I’ll try to get a video of lighting it which could turn out quite funny…
Update: The stove didn’t work very well - upon lighting it the meths burnt off in a big puff of singed hair and wouldn’t turn into anything more.
I’m guessing the holes where too big causes a massive rush of oxygen into the fuel “store” and it burning off very quickly.
I’ll have another go at building one some time soon as I burnt this attempted (we had a reasonably sized fire, what else would you do) and let you know if it turns out any better.